A simple guide to EVE-NG Networking
EVE-NG is a really neat way to virtualise networking stuff - routers, switches, load balancers etc.. I’m not going to harp on about it. However, when you start to run some more demanding labs (like the JNCIE/CCIE labs) - you might want to start running it on a server of your own (or that you rent from a bare-metal server provider in the cloud).
You’re a network engineer, or at least a wannabe one. You know how to stick a BGP peering on a thing or make a devastating broadcast storm - but do you know enough about Linux networking to save the president set up EVE-NG in your own LAN and maybe build a simple lab topology? Well.. If not, you can follow along with my garbled process below!
DISCLAIMER: I am a plum duff and don’t really understand everything about everything, so please use this as a guide, ask questions and try stuff in a safe environment.
Stuff we’ll need:
- An EVE-NG install on a server (a bare metal install). I recommend you follow the instructions. If that’s still a problem, let me know and I’ll write up a more clear guide!
- An SSH client (terminal on a Mac/Unix, PuTTY on Windows etc)
- A good understanding of our LAN environment (i.e. the IPv4 address of our router, the size of the subnet etc)
- Heart
I’m going to break this post into chunks covering the server itself, the Ubuntu operating system and the EVE-NG software itself. It’s not exhaustive by any means - just a taster!
Part 1: The server itself
Typically, when we have a server - it will tend to have a bunch of NICs (which is how server-dweebs refer to network ports/interfaces). One of them will be to the BMC (baseboard management controller), a dedicated RJ45 (ethernet plug!) connecting to its own little computer on board. This is also called the iDRAC (integrated Dell Remote Access Controller!) or IPMI (Intelligent Platform Management Interface - phew!) connection for branding reasons, or “out-of-band” controller, for the simple reason that the Rules of Computing require us to have at least 4 conflicting names for the same thing.
Put simply, this allows us to have an ‘always on’ connection to manage our server, regardless of what the installed operating system is doing (even if it’s shut down!). This is super useful when tooling around with stuff we don’t understand (hi!) - because it’s our get out of jail free card when things go wrong. In my case, it means I can ruin the server setup and fix it without having to get off the couch. Go through the setup for your server’s particular BMC and give it an IP address. Once it’s done, you can get to a GUI for managing the server, seeing a remote console (like plugging in a screen/keyboard for accessing the host operating system, but without moving from your chair!). It also lets you boot and reboot the server, mess with disks, RAID config, CPU and RAM settings..
Wow, I guess I should just marry a BMC, since I love them so much?
Part 2: Ubuntu - or - our host OS
The non-BMC NICs will be for the host operating system, which in our EVE-NG case, will be Ubuntu. In my server, I have a 4 port 1Gbit/s Ethernet card, so I have 4 “non BMC” interfaces at my disposal. Ubuntu (at least version 16) labels the NICs it has available as ethX, where X is a number starting from 0. My server has 4 NICs dedicated to Ubuntu, so I have eth0-eth3. Go me.
In a “normal” setup, you would set an IP address on an eth interface, plug that into your switch or router and away you go. EVE-NG ratchets the insanity up to another level, by binding the ethX interfaces on your server to a virtual switch inside the Ubuntu OS itself (known as a bridge). This lets you get tricky by having more than a single eth interface share an IP, gives you some form of fault tolerance. In my case, it’s not worth doing anything with the bridge except configuring an IP on it and accessing my EVE-NG GUI.
Check out this cool example of what I’m talking about here:
# The primary network interface
iface eth0 inet manual
auto pnet0
iface pnet0 inet static
    address 192.168.0.111
    netmask 255.255.255.0
    gateway 192.168.0.1
    dns-domain eve-ng.dical.org
    dns-nameservers 1.1.1.1
    bridge_ports eth0
    bridge_stp off
What we see there is a pnet0 (bridge) interface, that is using eth0, and has the IP 192.168.0.111, which is statically set (i.e. not DHCP, but you can totally do that too if you’d rather). Is having a bridge with a single physical interface actually useful? We’ll see a bit later on (spoiler: yes, see Part 4).
Part 3: EVE-NG
Before we started, we set up EVE-NG according to their documentation - in my case with the IP 192.168.0.111. But EVE-NG is a network simulation platform - so we’re going to expect to see a lot more networks cropping up. How EVE-NG does this isn’t magic - fairly broadly it simulates wires with virtual switches (more bridges!).
Here’s a simple topology in EVE-NG with 2 routers “back to back” as I like to say. Most people dislike when I do, but hey this is my website.
An aside: The “routers” I am using here are Juniper vSRX security devices, running in “packet mode”. This is a Junos configuration that lets firewalls be routers, which makes for excellent light-weight lab machines. I got the image from Juniper here - and followed the instructions to add them to EVE-NG here. If you can’t make it through with those instructions alone please let me know, and I can do a post on it.
Creating a new device on our topology is very simple, adding two devices with the default settings of 4 Gig Ethernet interfaces, each consuming 4GB RAM and 2 CPU cores (these resources belong to the Ubuntu server remember, so build out your lab to suit your needs and if you run out - buy a bigger server!)
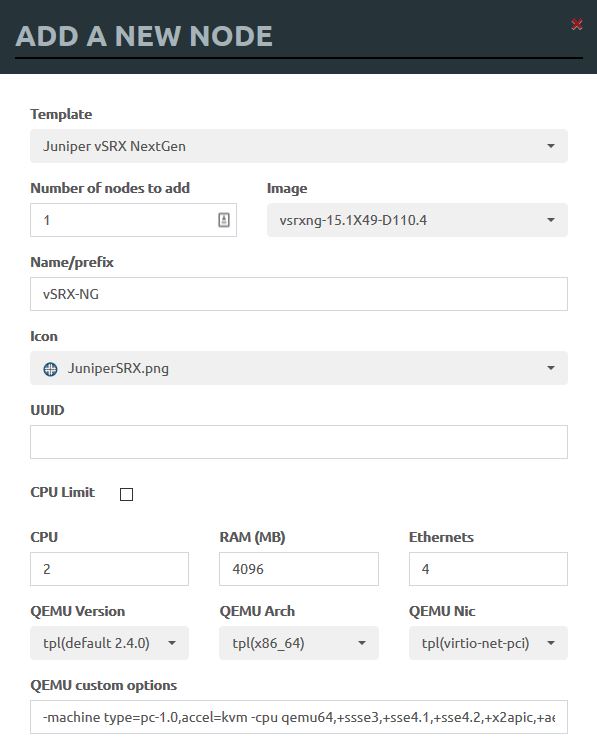
You can use the add node feature to add as many devices as you like at once, set parameters and tweak them - but I generally just use the defaults and only adjust the number of network interfaces I want each one to have. You can always edit them later!

Here is my full config for this test for vSRX1:
root@vSRX1> show configuration
system {
    host-name R1;
    root-authentication {
        encrypted-password "$zzz"; ## SECRET-DATA
    }
}
interfaces {
    ge-0/0/0 {
        unit 0 {
            family inet {
                address 10.0.0.1/24;
            }
        }
    }
}
security {
    forwarding-options {
        family {
            inet6 {
                mode packet-based;
            }
            mpls {
                mode packet-based;
            }
            iso {
                mode packet-based;
            }
        }
    }
}
I have set up the routers to have an IP address each on ge-0/0/0:
root@vSRX1> show configuration interfaces ge-0/0/0
unit 0 {
    family inet {
        address 10.0.0.1/24;
    }
}
They can ping each other (yeesh that is crummy latency, this isn’t a great router image and it’s struggling, ignore that):
root@vSRX1> ping 10.0.0.2
PING 10.0.0.2 (10.0.0.2): 56 data bytes
64 bytes from 10.0.0.2: icmp_seq=0 ttl=64 time=9.516 ms
64 bytes from 10.0.0.2: icmp_seq=1 ttl=64 time=10.558 ms
Now - that’s great - but how is EVE-NG doing this? These two routers don’t *really* exist, nor does the cable between them.. We’re using more bridges here, which EVE-NG is calling ‘vunl’ interfaces. From what I can tell, this is a throwback to when EVE-NG was called UNETLAB, and these are “Virtual UNet Lab” interfaces - but this is just a guess (please correct me if you are in the know).
We can find out which virtual Linux interface EVE-NG has assigned to the “cable” by selecting a router and telling EVE we would like to do a capture. This will launch a packet capture utility if we have set it up. If not (like lazy, lazy me) - we can do it ourselves inside Ubuntu AND learn something (gross!).
Clicking on the capture for ge-0/0/0 on vSRX1
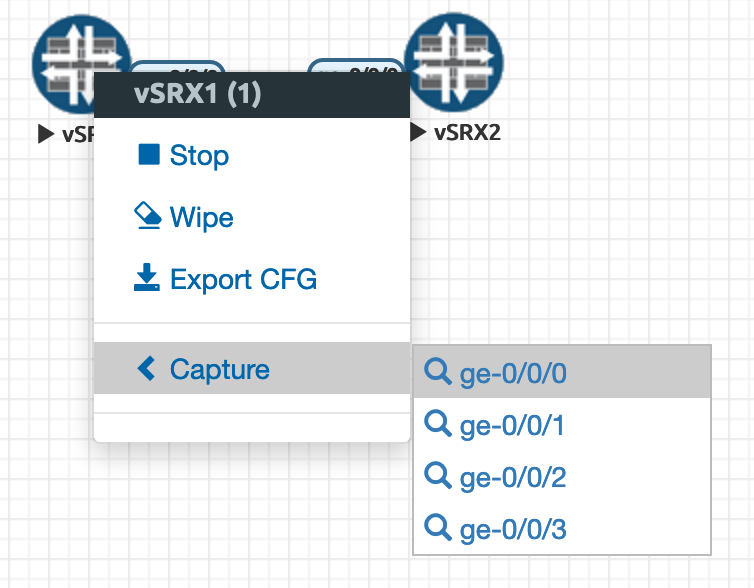
That directs our browser to this URL, which can be caught by a pcap utility (if EVE-NG is setup to handle that) - or just give away which bridge is in use:
capture://192.168.0.111/<strong>vunl0_1_0</strong>Now - we can SSH into EVE-NG (you will have already done this during setup, but if not, you wanna use terminal or PuTTY if on Windows) - “ssh james@192.168.0.111” in my case. We can poke around in the nuts and bolts of Ubuntu all we like, or take a peek at “vunl0_1_0”!
james@eve-ng:~$ ifconfig vunl0_1_0
vunl0_1_0 Link encap:Ethernet  HWaddr 1a:05:e3:0c:2e:5f
          UP BROADCAST RUNNING MULTICAST  MTU:9000  Metric:1
          RX packets:142 errors:0 dropped:0 overruns:0 frame:0
          TX packets:142 errors:0 dropped:0 overruns:0 carrier:0
          collisions:0 txqueuelen:1000
          RX bytes:13804 (13.8 KB)  TX bytes:13804 (13.8 KB)
Using the “ifconfig” command, we can see the “wire”. Don’t believe me? Well, let’s crack out tcpdump and have a peek into said wire:
james@eve-ng:~$ sudo tcpdump -i vunl0_1_0
tcpdump: verbose output suppressed, use -v or -vv for full protocol decode
listening on vunl0_1_0, link-type EN10MB (Ethernet), capture size 262144 bytes
22:55:28.378802 IP 10.0.0.1 > 10.0.0.2: ICMP echo request, id 41476, seq 4, length 64
22:55:28.379292 IP 10.0.0.2 > 10.0.0.1: ICMP echo reply, id 41476, seq 4, length 64
22:55:29.383831 IP 10.0.0.1 > 10.0.0.2: ICMP echo request, id 41476, seq 5, length 64
22:55:29.384281 IP 10.0.0.2 > 10.0.0.1: ICMP echo reply, id 41476, seq 5, length 64
Blimey. There’s the echo request/reply pairs that make up ping, between our two hosts.
For the curious - here are some more details about our “wire” - vunl0_1_0. It’s not a ‘real’ switch or bridge, simply a logical construct inside Ubuntu. It doesn’t bind to any physical interface on the server, it just exists to patch the interfaces of our virtual devices together in their own broadcast domain. You can see some more info on the way Ubuntu sees this with ethtool:
james@eve-ng:~$ sudo ethtool vunl0_1_0
Settings for vunl0_1_0:
        Supported ports: [ ]
        Supported link modes:   Not reported
        Supported pause frame use: No
        Supports auto-negotiation: No
        Advertised link modes:  Not reported
        Advertised pause frame use: No
        Advertised auto-negotiation: No
        Speed: 10Mb/s
        Duplex: Full
        Port: Twisted Pair
        PHYAD: 0
        Transceiver: internal
        Auto-negotiation: off
        MDI-X: Unknown
        Current message level: 0xffffffa1 (-95)
                               drv ifup tx_err tx_queued intr tx_done rx_status pktdata hw wol 0xffff8000
        Link detected: yes
Here we can see a few interesting tidbits. For one, Ubuntu sees this as a “real” interface, nothing special. It thinks it’s a twisted pair cable, and is running as 10Mbit/s full duplex. That might help explain the crummy ping!
Part 4: EVE-NG to the real world
So - now we can see the way that EVE-NG uses bridges to achieve connectivity between virtual network elements. Some other cool things would be the ability to have management IPs for our virtual clouds using IP ranges in our home LANs - that would let us ‘natively’ SSH into them from our desktops, without needing to jump off another host inside EVE-NG. Still with me? God I hope so.
I’ve added a new “Network” from the EVE-NG menu. I set it to use Management (Cloud0) and gave it the name “My LAN”.

Then I connected it to vSRX2 like so:
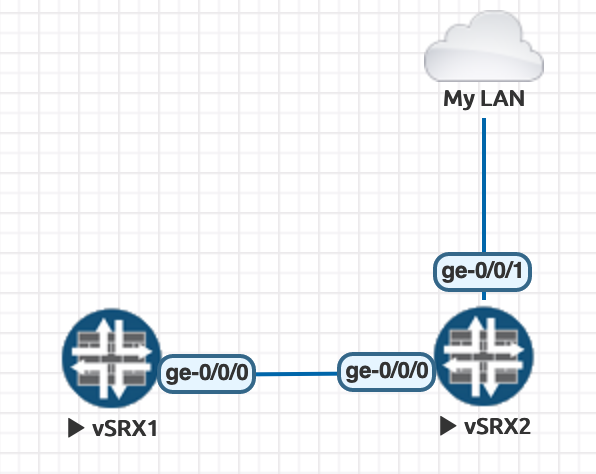
Now, I configure an interface on vSRX2 (it should be loopback0, but that’s a job for another day - so now it’s ge-0/0/1) and give it an address in my home LAN (192.168.0.112)… Next thing you know, I can SSH directly into the vSRX from my laptop. This majorly speeds up lab work, automation etc and makes life a LOT easier.
“Management(Cloud0)” is something that EVE-NG provides out of the box - it’s a bridge that is connected to our pnet0 connection - which I alluded to before. This bridge, with a physical connection (eth0 in my case) allows virtual devices inside EVE-NG to communicate with the LAN outside. If they have the correct routes, they could even communicate with the internet herself. The little cloud icon and associated cloud network don’t really tell us much - but that’s where the brctl or “bridge control” command comes in (again, running this on the EVE-NG machine, via SSH):
james@eve-ng:~$ brctl show pnet0
bridge name     bridge id               STP enabled     interfaces
pnet0           8000.90b11c23aafa       no              eth0
                                                        vunl0_2_1
What this does is show the bridges on our system, and which interfaces are bridged together. It’s a super powerful command, you should look it up (or type “man brctl” in your EVE-NG shell!) - but here it clearly shows that our physical, real link - eth0, is bridged to our vSRX ge-0/0/1 on vunl0_2_1. Lovely.
Note - be a bit careful when bridging the virtual world to the real world - you are potentially exposing your lab topology to the internet.. If you’re doing this anywhere near a production network, or somewhere that won’t appreciate potentially disruptive protocols leaking out (BPDU flood anyone?) - then be careful, use appropriate ACLs etc.
Have fun!